Post Production
In post production i wanted to enhance the futuristic look of the images. therefore after doing all the necessary retouching i darkened the blacks / shadows and opted for a more De-saturated colour pallete this gave the images a more Sci-fi appearance which i felt complimented the overall aesthetic look of the images.
One of the main problems with this technique is the inconsistency in the outcome of each shot. There were shots where the model looks good in the frame but there is lack of motion blur or the blur does not look attractive. (fig1)
There are shots where the blur looks good but the model is captured in a less attractive position / angle, (fig2)
fig2
and there were shots where the model would be caught at the edge of the frame or fall out of the frame completely. (fig3)
occasionally it was necessary to repeat the same actions and movements constantly until we got the shot needed, Communication between the model and myself was a very important factor as timing was crucial to ensure that the model made enough movements and ended up in the final position at the right time for the flash to go off. it also helped in working out what actions and movements would create a more attractive blur.
during the shoot i was careful to make sure i also has some shots taken without flash to enable me to capture only the blurred movement. this was so that i could use them in post production to composite into frames which lacked blur.
(All Images © sylvia shek – all rights reserved)Test Shoot
Overall I think the test shoot worked well, and it’s helped me to identify areas that I need to take note of for when I come to do the actual shoot.
For this Image I think the model was placed slightly too close to the background therefore there was still a slight light spillage affecting the blacks. Pulling back the shadows and the blacks in camera raw helped slightly but the best way around this issue is to make sure the model is far enough away from the background.
With this image the model ends up at the side of the frame. this is mainly due to the fact that the shutter fires at the end of the exposure, therefore when the model moves it is vital that they dont move too far and end up outside of the frame.
In this image the models hair and shoulder is blending into the shadows too much and there is not much definition in the head area of the motion blur making it appear headless. It is important that the blur looks just as aesthetically pleasing as the main image does. A good way round this problem is to shoot lots of motion burr frames so that they may be used during post production to be merged into other frames to create more pleasing aesthetics.
Once again the models shoulders and hair is disappearing into the blacks. a way round this would be to either introduce another light source high up behind the model shining downwards, this would bring out highlights over the shoulders and hair creating more definition. Another way could be to shoot the model separately and blend in with previously captured motion blur during post production.
For the next shoot I will add the additional light source . also when styling the model i will aim to use lighter / bright colours as opposed to darks / blacks these measures will help reduce the likely hood of the clothing blending into the shadows.
Lighting test
Spent the day in the studio testing out the lighting.
I struggled at first to find the correct set up to achieve the desired effect, but eventually found a set up that worked quite well.
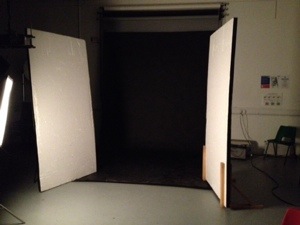
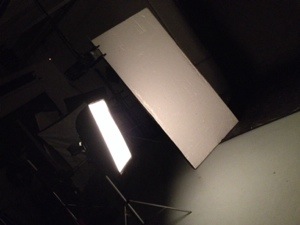
In a dark studio i set a black background and added 2 white diffuser boards to bounce light back into subject.
For the light source i used the soft box with the modeling light on full power the flash on full
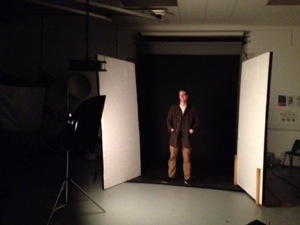 The model was positioned at a distance from background to prevent light spill from the soft box affecting the blacks of the background
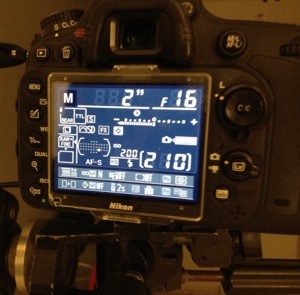
The camera was set to rear curtain sync flash mode, with an aperture of f16 and a 2 second shutter drag.
Slow + Rear Flash; what, when, how
article explaining the differences of the slow & rear sync flash & the whys & hows .
http://steveloosphotography.blogspot.co.uk/p/slow-rear-flash-what-when-how.html
Makeup Ideas
been researching makeup ideas and thinking that a more futuristic / extreme effect will go quite well with the shoot.
I’m thinking something similar to the following images
Image source – http://media-cache-ec0.pinimg.com/originals/1c/a0/96/1ca0961f449b109650683bd790952dda.jpg
Image source – http://rugely.deviantart.com/art/Para-Flora-190987406
Image source – http://www.eyeshadowlipstick.com/wp-content/uploads/2010/10/christian-dior-haute-beauty-2.jpg
Image source – http://media-cache-ak0.pinimg.com/originals/73/8a/c2/738ac23a55070a6c065ce424e5e7a71b.jpg
Image source – http://media-cache-ak0.pinimg.com/originals/4d/dc/22/4ddc22f71ba1209070c221354fe8f95b.jpg
Image Source – http://tomihirokono.blogspot.com.au/2010/09/katharina-by-kim-jakobsen-to-for.html
Camera Settings
spent the past half hour trying to work out how to set my camera to rear curtain sync flash.
after hunting out my Users manual, (admittedly its the first time i’ve actually read the thing lol ) and fiddling about with the buttons for a while I’ve worked out how its done.
getting all set to test the lighting & techniques on wednesday,before going ahead with the proper shoot next week. gonna be fun =]
Benjamin Von Wong
Great examples of motion blur by Benjamin Von Wong for his his video and still shoot for Filler Magazine, entitled “The Red Mistress.”
Image Source – http://fstoppers.com/von-wongs-red-mistress-bts
Watch the Behind the scenes footage here
In this video Von Wong describes the technique as – “Shutter drag with a rear curtain sync flash”. which basically means to use slow shutter speed and Introduce the flash at the end of the exposure.
sounds easy enough!!….
Booked into the studio on Wednesday to test out the techniques before the actual shoot. that way i won’t be wasting time experimenting and wondering why things don’t work.






Recent Comments